EngageCX FAQs
What Is EngageCX?
EngageCX is our new omni-channel product that allows Web Chat, Texting, Email, and Social Media to be integrated into a single interface.
It empowers businesses to manage all customer conversations from one place, improving response times, team efficiency, and customer satisfaction.
Agent/User FAQs
New to EngageCX? Use this frequent question list for fast answers!
Just click on the Title in the Table of Contents to skip to your Question!
EngageCX Demo Video
How do I answer a Live Web Chat?
Answer:
Follow the steps below.
Instructions:
- If you are an Agent, when you login, you will be in the Agents Panel. The Agents Panel is where all customer communication is performed.
- If you are any other Role, you may load into the Control Panel view instead. If this is the case, simply click the Agents Panel icon in the top right.
- If you have not already, simply click your Chat Status icon in the top right and go Online.
- As long as you have been added to the Web Chat Queue, you will be sent live Chats. You will hear your notification sound when the Chat connects to you automatically.
- Simply click the Web Chat icon and Reply to the customer.
- When the Conversation is completed, click Leave, then Close.
Need more information about reply options or screenshots of Chat Conversation? Try this article: How to Web Chat from EngageCX.
Are there any Best Practice Notification Settings for Web Chat or Inbox (Text/Email/Social Media)?
Answer:
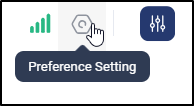
Absolutely. We recommend the following Notification Settings. These recommendations are all accessed in the Preference Setting of your Agents Panel.
Web Chat:
- Auto Replies
- In Web Chat Preference Settings, turn off all Auto-Replies. If Auto-Replies must be used, make sure to customize your reply and remove all Macros unless instructed to use them.
- Notification Sounds
- In Web Chat Preference Settings, listen to each Notification Sound and ensure that it is distinct and that the Volume is at a good level for you.
- If your computer itself has any Notification sound restrictions, such as Windows "focus", adjust as needed to ensure that your Notications aren't blocked by this outside setting.
- "Ask for Status" every Login
- In Global Preference Settings, checkmark "ask for status preferences every time you log in". The default status upon login is "Online".
- By checking this preference, you will be able to choose your Status when you login. This will prevent a live Chat from being pushed to you before you ready to go Online.
Inbox
- Notification Sounds
- In Inbox Preference Settings, listen to each Notification Sound and ensure that it is distinct and that the Volume is at a good level for you.
- If your computer itself has any Notification sound restrictions, such as Windows "focus", adjust as needed to ensure that your Notications aren't blocked by this outside setting.
- Email Signature (if you are assigned to Email)
- In Inbox Preference Settings, choose Email Signature. Load your Email Signature and any salutation. Save.
- Note: If your Signature contains an Image and it is pasting in as plain text, you may need to add the image manually by clicking the Insert Image icon.
Need more information about other options in the Agents Panel? Try this article: EngageCX Agents Panel Navigation.
How do I answer an Inbox Ticket Conversation? (Text/Email/Social Media)
Answer:
Follow the steps below.
Instructions:
- f you are an Agent, when you login, you will be in the Agents Panel. The Agents Panel is where all customer communication is performed.
- If you are any other Role, you may load into the Control Panel view instead. If this is the case, simply click the Agents Panel icon in the top right.
- Click the View that matches the Ticket that you will be answering.
- Choose your Ticket by clicking on it.
- In the Reply box, type your reply to the customer.
- Once the Conversation is complete and all actions taken, you may switch the Ticket Status to Resolved.
- This is the same as "closing" a Ticket as it indicates the Conversation is now resolved.
Need more information about reply options or how text/email works? Try these articles: How to Email in EngageCX /How to Text in EngageCX.
I've been told that we have "Shared Texting". What is that?
Answer:
Shared Texting is the ability for more than one User to be assigned to answer Ticket Conversations from a single registered Texting Number.
Depending on your setup, you may be assigned Tickets or these Tickets may be assigned directly to the Queue.
Either way, you will be able to see all Tickets in your Queue, regardless of the Owner. You may reply to the customer from the existing Ticket, even if the Ticket is not assigned to you.
Either way, you will be able to see all Tickets in your Queue, regardless of the Owner. You may reply to the customer from the existing Ticket, even if the Ticket is not assigned to you.
- To the customer, this is invisible. They will simply receive the return text.
- All Agent replies will be identified in the Conversation Ticket itself, allowing for tracking and easy visual identification of who sent which Text (and when).
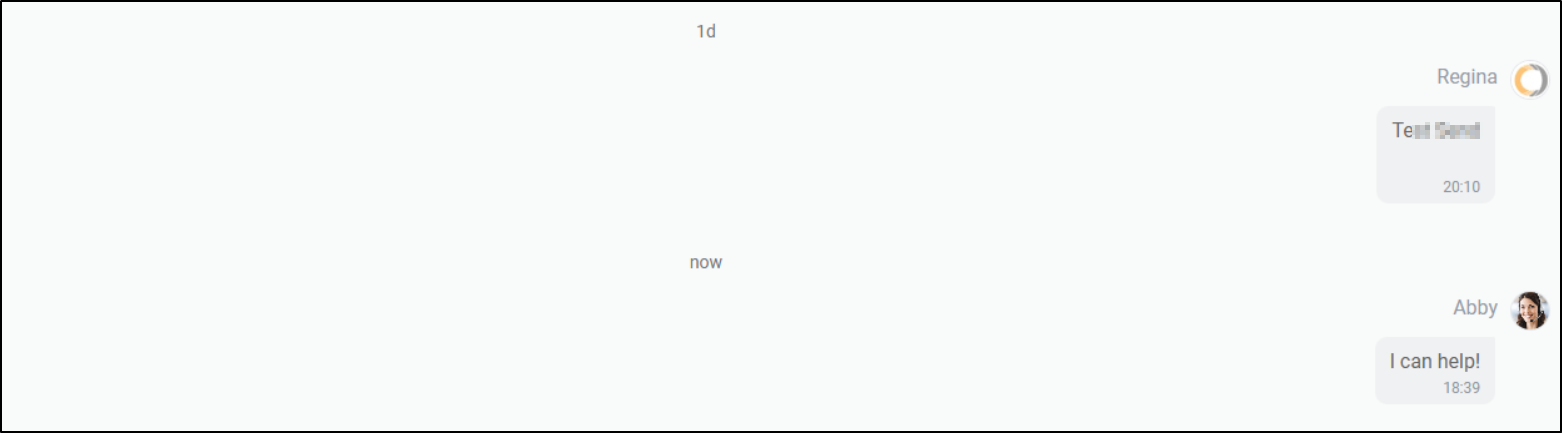
Example: Agent One sends the first text with no response from the Customer. Agent Two (Abby) sends a follow up text the next day from the open Ticket.
Need more information about how Texting works? Try this article: How to Text in EngageCX.
I need to send an Email from our imported Support Email, but I don't want a Ticket made. Can I do that?
Answer:
If you have access to the actual Email Account outside of EngageCX, you may send the Email from that account instead. When the Email is sent directly from the account (outside of EngageCX), the "send" will not be forwarded in EngageCX.
- If you do not have access to the actual Email Account, you may still: compose the Email from EngageCX, assign it to yourself before it is sent, and then send it.
- Your options after that will be to immediately set the Ticket to Resolved or, with permission, to Delete the Ticket.
Need more information about Email? Try this article: How to Email in EngageCX.
Can I send File attachments in Text and Email?
Answer:
Yes, Attachments are supported. The size limit for Text is 800kb. Email allows for 30mb files.
- File Names should be limited to 20 characters or less to allow the send.
Need more information about send options? Try these articles: How to Email in EngageCX/How to Text in EngageCX.
Why would I want to assign a Queue if I initiate Customer Contact without a Ticket?
Answer:
When a Customer is contacted and a Ticket does not exist yet, a new Ticket will be created.
In the creation screen, you will have the chance to assign the Ticket manually to a Queue and Agent (including yourself). This is highly recommended.
- Choosing to assign the Ticket will ensure that the Ticket is assigned to the proper Queue and Agent for next Contact.
- If no distribution or routing rules apply for the new Ticket, the default is to be set to "Unassigned".
Need more information about Outbound Text/Email/Social Media messages? Try these articles: How to Email in EngageCX/How to Text in EngageCX.
How Do I See What Chat Queues I Am Assigned to?
Answer:
Your Chat Queue list is part of your Profile and can be accessed in either EngageCX view.
To view this list, follow the steps below:
Instructions
- Click your Profile icon in the top right of either View.
- Choose Edit Profile.
- Your initial Profile tab will show all assigned Chat Queues.
How do I turn on Single Sign-On (SSO) or Multi-Factor (2FA) Authentication?
Answer:
Your password and login preferences are part of your Profile can be accessed in either EngageCX view.
To choose Single Sign-On (SSO), you will link your Profile to your Google or Microsoft Login.
To edit the SSO setting, follow the steps below.
Instructions:
- Click your Profile icon in the top right of either View.
- Choose Edit Profile.
- Choose Security Settings, then choose Single Sign-On. The onscreen instructions will walk you through connection.
- You may then log out, and when you pull up the login Window again, you will now see the connected SSO option below "Sign in". Simply click the icon, and the Single Sign-On will verify.
Can I update my Profile picture, Title, or Contact Information?
Answer:
Short answer? Yes! These items are all available in your Profile. Profile can be accessed in either EngageCX view.
To view or edit personal information, follow these steps.
Instructions:
- Click your Profile icon in the top right of either View.
- Choose Edit Profile.
- Your Profile tab will load. Any item that you may Edit will show an Edit button or Edit pencil icon beside it.
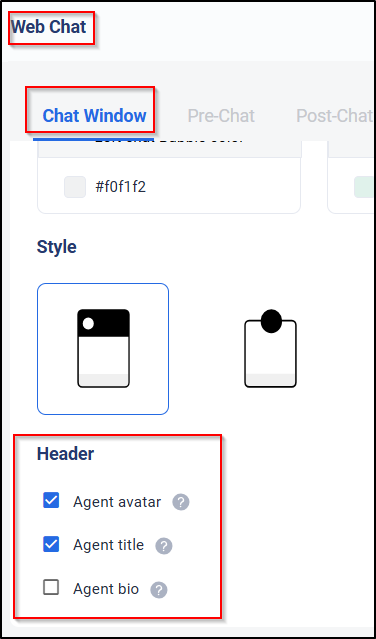
- Web Chat Agents: Depending on how your Web Chat is configured, some Profile fields may be displayed publicly in your company website Web Chat window.
- For example, some Tenants who use Web Chat choose to display the Agent's Title, Bio, and/or Profile Picture as part of the Agent Identification in the Widget.
- Web Chat Agents: For security purposes, we highly recommend entering an Alias and appropriate Profile icon for Web Chat.
- Alias: Choose Edit Personal Information. The name saved in Alias is what will be displayed when you connect to a Visitor during a live Web Chat. This allows you to hide your Full Name.
- Profile Icon: Click the current Avatar or loaded picture to access the change picture screen.
Assigned to Web Chat but unsure what is displayed? You may contact your Management or Clarity to determine what Fields are shown during Live Web Chat.
The "public display" settings are configured in the Web Chat>Chat Window menu and were originally set during Installation. If management should choose, these settings may be changed at any time.
Supervisor/Manager/Admin FAQs
New to EngageCX? Use this frequent question list for fast answers!
Just click on the Title in the Table of Contents to skip to your Question!
What's a Tenant?
Answer:
The "tenant" is where the Users, Routing, and customer interface live. This is similar to the "domain" in the Portal. Just like in Portal, you will have two Views.
- You may toggle between these two views by clicking the shortcut icon located in the upper right of the window of the screen.
Agents Panel is where all Customer Communication, including live Web Chat, is performed.
- Unless otherwise restricted, every User has the Agents Panel view. The Chat Queues and Inbox Tickets that are visible and accessible are determined by the User's assigned permission Role.
Control Panel, is where all Configuration, Connection, Routing, and Reports are housed.

- Unless otherwise restricted, every User as a version of the Control Panel view. Visible Menus are determined by the options that the Tenant uses and the User's assigned permission Role.
Where do I find "Manager" options?
Answer:
The majority of the "manager" options are housed in the Control Panel view.

- If you are currently in the Agents Panel, you can open up the Control Panel view by clicking the Control Panel icon in the upper right of your window.
Some of your Screenshots show Menu icons that I don't recognize. Is there a reason?
Answer:
The menus you see are based not just on your permission Role, but also your Tenant's selected features.
- Example: If you are only using Texting, we will hide the Omni Widget/Web Chat menu so that your View includes only what you will use.
If you do find that a feature or Menu should be visible to you, let us know! We will look at your enabled Menus and, if appropriate, either enable the Menu for your Tenant or adjust your permission Role.
How do Permissions compared to Portal?
Answer:
Permission level/Scope is called Role in EngageCX. Roles are customizable, and we have the ability to create specific Roles based on your needs.
- The Default Roles are: Agent, Supervisor, and Admin.
- Depending on your needs, you may also see the Manager Role and/or Shared Texting Role as well.
Role Description and Comparison
Agent: This Role is closely compared to a Call Center Agent in Portal. All permissions below will also be dependent on which Channels have been activated for the Tenant.
Agents will typically have access to:
- Take Web Chats
- View full Chat History for any Web Chat Queue they are assigned to
- View the live Queue Dashboard
- Create and view their own Inbox Tickets
- Create Private Inbox Ticket Views.
- If a Public/Shared Inbox Ticket View is assigned in the Tenant, but they are not assigned to that Queue, the Agent will still see the Inbox View, but will be unable to view or access any Tickets in it.
Shared Texting (or Email) Agent: This Role is closely compared to a Call Center Agent in Portal, with one added permission.
- Shared Roles can view and reply not just in their own Inbox Tickets, but in any Inbox Ticket in any of their assigned Inbox Chat Queues.
- This extra assigned ability is what makes sharing not just possible, but easy and intuitive.
Supervisor: This Role is closely compared to a Call Center Supervisor in Portal. All permissions below will also be dependent on which Channels have been activated for the Tenant.
We will often customize the Supervisor Role to more closely mirror your needs. However, this Role will generally have everything an Agent would have, plus:
- Monitor Web Chats for any Chat Queue they are assigned to
- Ban Website Visitors
- View and Reply in any Inbox Ticket for any Chat Queue they are assigned to
- View and Reply to Inbox Tickets in the Unassigned Ticket status
- Add Public/Shared Inbox Ticket Views
- Add Public/Shared Canned Messages
- View access to Agents
- Ability to Add Agents to Chat Queues
Depending on the needs of your Tenant, we may also enable: View/Export Reports, Web Chat Skill assignment, and/or the ability to change Company Hours (to add Web Chat Holidays).
Manager: This Role is closely compared to a Office Manager in Portal.
This Role has no specific default as it is custom-built for Tenants who need at least one User to have additional permissions past what a Supervisor would have. However, this Role will generally have everything a Supervisor would have, plus:
- View/Edit/Merge Contacts
- Monitor Web Chats for any Chat Queue
- Web Chat Skill assignment
- Change Company Hours (to add Web Chat Holidays)
- View and Reply to any Inbox Ticket for any Chat Queue
- Inbox Ticket Tags
- View/Create/Delete Articles in the Help Center Knowledge Base
- Create/Delete/Edit access to all Users (except Admin)
- View Agent Login Logs
- View/Export Reports
Depending on the needs of your Tenant, we may also enable: Web Chat Configuration and Routing, Inbox Channel Configuration and Routing, and Routing Flow Automation.
What is the "Owner" Admin?
Answer:
In EngageCX, there is always an Admin Owner of the Tenant. The Admin Owner has access to any enabled Menu in the Tenant and change Configuration of any User, Channel, or enabled Setting.
- This Role is generally assigned to the Owner of the Account or their designated representative, and is the User that Clarity uses when assisting you with Routing or other changes.
- Although it is technically possible to add an additional "Admin" Role on the Account if requested, we strongly advise against adding multiple Admin Users for security and tracking purposes.
- Instead, we recommend that an additional Custom Role be added that includes Manager permissions plus whichever additional permission was needed. There is no additional charge to create a Custom Role.
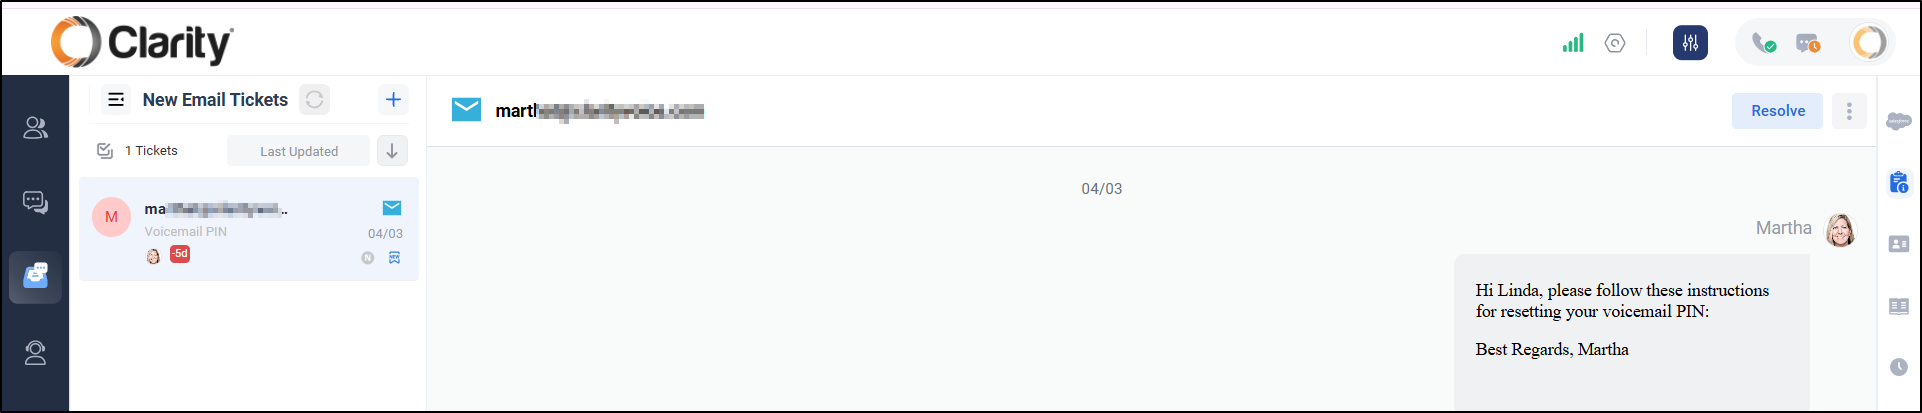
What is an "Inbox"? How is it different from Web Chat?
Answer:
An Inbox Channel is any imported Channel from an external Source.
- Inbox Channels include: Text, Email, and Social Media Chat Apps like Facebook, Instagram, Telegram, and WhatsApp.
- Inbox Channels forward your messages to and from these External Sources into EngageCX, while leaving your original Account activity as is.
- Inbox Tickets are created in EngageCX from these forwarded messages as a record of the Conversation, and as a way for Users to communicate with these Visitors without having to login to each Account directly.
Web Chat is not an Inbox Channel. That is because Web Chat is not forwarding messages from an external source Account.
- Web Chat is created by installing the EngageCX Web Chat Widget Code in your chosen Website Page(s).
- Messages are created by website Visitors choosing the Chat option in the installed Widget.
- These Messages are live Conversation, so no Ticket is needed. When either the Agent or Visitor leaves the Conversation, the Conversation is then closed.
Can I monitor a Live Web Chat?
Answer:
Yes! If you have the assigned Role, you will be able to Monitor a Chat.
- Just go to the Visitors List in the Agents Panel.
- You will be able to view any Live Chat that is assigned to any of your Web Chat Queues.
- You may only view ongoing Chats from other Web Chat Queues that you are not assigned to if you have specifically been given this permission. These Chats will simply not appear in your List.
- If there is a live Chat with a User who has a higher role than you do, you will not see this Chat.
- Click Monitor on any live Chat that is available in your list.
- You will be pushed to this specific live Chat. You will be able to read both Agent and Visitor Responses as they come in.
- If needed, you may use the Internal Chat or Note options to guide your Agent through the Conversation. Both methods are invisible to the Visitor.
The Note option is generally preferred because it allows you to keep a permanent record of your instruction right in the permanent Transcript. It also prevents the Agent from needing to access another Chat to receive your instructions.
Can I view or edit an Inbox Ticket Conversation?
Answer:
Absolutely. If you are assigned to that Queue, or if you have the "view/edit Tickets not in my Queue" permission, you will be able to access the Inbox Ticket, regardless of Ticket Owner.
How do I find a past Web Chat or Inbox Conversation?
Answer:
Web Chat Transcripts and past Visitor Information can be found in the Control Panel. Inbox Channel Tickets remain in the Agents Panel.
- Both Web Chat Transcripts and Inbox Tickets may be filtered by Date, Queue, and/or User.
- Web Chat: Control Panel>Omni Widget>History. Then choose Chats.
- Inbox Conversation Tickets: Agents Panel>Search icon (above Views) or use a View to look at groups of Tickets that match your filter.
What's the difference between the Dashboards and the Reports?
Answer:
Dashboards are a live look at the Inbox or Web Chat Stats and are considered "real-time" as they are the stats for the day up to that moment in time.
- The "Omni-Widget" (web chat) and "Inbox" Dashboards are the top/default view for the Omni Widget and Inbox Menus respectively.
- Unless specifically prohibited, the "Omni-Widget" (web chat) and "Inbox" Dashboards are visible to any User.
- Any live Dashboard that lives under "Reporting" will be hidden to any User who does not have the Reporting Menu as part of their Role.
Reports are found in the Reporting Menu. Reports are only visible to Managers and above. By request, we will also enable Reports for the Supervisor Role as well.
- Reports include historical options and additional Filters. Most Reports include an Export option as well.
- Any live Dashboard that lives under "Reporting" will be hidden to any User who does not have the Reporting Menu as part of their Role.
Can I add/remove my own Users in EngageCX?
Answer:
If your Role includes the "edit Agent" permission, you may both View and Edit all Users.
- When you purchase your EngageCX Seat licenses, these licenses are recorded and displayed in the Global Settings>People>Agents menu, along with your User list.
- Your Seat limit will be displayed for you at all times a the top of the Users (below the blue + Add icon).
- Deactivated Users do not count toward your User/Seat limit unless/until they are reactivated. Deleted/Removed Users also do not count toward your User/Seat limit.
- You may Add (up to your Seat limit), Deactivate, and Remove Users if you choose to do so. Alternatively, you may always contact us to make your User changes for you.
We would be happy to make these changes and ensure that the Users are also added to the proper Chat Queues and Roles.
If you should need to add more Seats than your current assignment, simply contact your Account Executive to add additional Seats.
What about adding Chat Queues?
Answer:
If your role includes the Create/View/Edit/Delete Chat Queues permission, you may add and remove Chat Queues to your Tenant.
- However, we highly recommend that Clarity Voice takes these actions for you to ensure that your EngageCX is optimized for your needs.
What about adding Agents to a Chat Queue?
Answer:
If your role includes the Create/View/Edit/Delete Chat Queues permission, you may add an Agent to an Existing Chat Queue.
- Generally, Supervisors and above would have this permission so that they may ensure that their Agents are in the Queue properly.
We are always happy to make this change for you.
Can I see EngageCX information in my Portal?
Answer:
Currently, these two Products are separately housed.
- However, we are working with our developers to include the ability to launch EngageCX from your Portal.
- Some limited information may be included for view as well. We will update our FAQs as additional information is available.
I see some features have not launched yet. Why not?
Answer:
Due to the customizable nature of this product, we are staggering this Feature launch in waves.
- This staggered launch allows us to fully test, adjust, and ensure that the Features work optimally across all Tenants.
There seem to be a lot of Routing options. How do I know if I have the "right" ones?
Answer:
As with any customizable product, knowing which option is the "right" one can feel overwhelming. We can guide you!
- Please contact us, we would love to work with you to discover your needs and set up EngageCX in a way that works best for you.
Need a "cheat" sheet of options you may want to keep in mind? See below for the Simple, Standard, and Automated Routing option descriptions.
Although this will not include every option, this should give you an idea of general capability of your routing.
There is no price difference between these Routing options; it's all part of what we offer!
Web Chat Routing
Simple
- Great for straightforward Web Chat needs and no fuss training.
- Chats come directly to Agents through the Queue with no information collection. Offline Routing uses the Offline Form and is emailed to your chosen Email Address for followup. (Or you may access the Offline Messages in your Control Panel by going to Omni Widget>History>Offline Messages.)
- Includes automatic Chat transcript email and Agent Skill options.
Standard
- A great fit for small to medium businesses who would like efficient Chat setup with additional Condition options.
- Uses Pre-Chat Form to collect information from Customers efficiently. Offline Routing uses the Offline Form and is emailed to your chosen Email Address for followup. (Or you may access the Offline Messages in your Control Panel by going to Omni Widget>History>Offline Messages.)
- Includes automatic Chat transcript email, Priority/Agent Skill options, as well as Queue Conditions such as "number of visits", "company", and custom Pre-Chat/Offline Questions.
- Also includes Post Chat survey if requested. Includes Agent Wrap Up if requested.
Automated
- This Routing has the most customization and is the most flexible for Complex needs.
- Your Pre-Chat and Offline options may use the Form or can take advantage of our customized Automated Flows.
- Flows provide Contact information collection, customized Conversation, Email options, and can include more than one Flow for a single Web Chat Widget.
- Includes automatic Chat transcript email, Priority/Agent Skill options, as well as Queue Conditions such as "number of visits", "company", and custom Pre-Chat Questions.
- Also includes Post Chat survey if requested. Includes Agent Wrap Up if requested.
Texting Routing
Standard
- A great fit for any business who would like to use standard or shared Texting and does not need auto-reply.
- Includes Queue Conditions such as Priority, Tag, Contact, and more.
Automated
- A great fit for any business who would like to use standard or shared Texting and may need time-based Auto Reply or information collection.
- Uses customized Automated Flows to provide auto-reply, Contact information collection, customized Conversation, Email options, and can include more than one Flow.
- Includes Queue Conditions such as Priority, Tag, Contact, and more.
Email/Social Media
Standard
- Easily customizable for most businesses.
- Auto-Reply can remain enabled from external Account without affecting EngageCX.
- Routing includes Queue Conditions such as Priority, Tag, Contact, and more.
- WhatsApp also has the option for an Automated Flow, which would provide information collection through EngageCX. Alternatively, this collection through auto-replies can live in the main WhatsApp Account.
How Do I Get EngageCX?
Just contact your Account Executive at 800-786-6160 for a Quote!
Prefer to contact us another way? You can also contact us by email or by request form!
By Request: Request Form.
Want to learn more about other Integration Options?
Give our Customer Service Team a call at 1-800-676-3995! We are available Monday-Friday 8am-9pm EST.
We’re here to help you find better, easier ways to run your business.
Related Articles
EngageCX Control Panel Navigation
What Is EngageCX? EngageCX is an upcoming omnichannel product that will allow for an integration of Web Chat, Texting, Email, and Social Media to be viewed and into a single interface. It empowers businesses to manage all customer conversations from ...How to Web Chat from EngageCX
What Is EngageCX? EngageCX is an upcoming omnichannel product that will allow for an integration of Web Chat, Texting, Email, and Social Media into a single interface. It empowers businesses to manage all customer conversations from one place, ...How to Update Web Chat Routing in EngageCX
What Is EngageCX? EngageCX is an upcoming omnichannel product that will allow for an integration of Web Chat, Texting, Email, and Social Media into a single interface. It empowers businesses to manage all customer conversations from one place, ...EngageCX Agents Panel Navigation
What Is EngageCX? EngageCX is an upcoming omnichannel product that will allow for an integration of Web Chat, Texting, Email, and Social Media into a single interface. It empowers businesses to manage all customer conversations from one place, ...How to Update Texting Routing in EngageCX
What Is EngageCX? EngageCX is an upcoming omnichannel product that will allow for an integration of Web Chat, Texting, Email, and Social Media into a single interface. It empowers businesses to manage all customer conversations from one place, ...