How to Text in EngageCX
What Is EngageCX?
EngageCX is our new omni-channel product that allows Web Chat, Texting, Email, and Social Media to be integrated into a single interface.
It empowers businesses to manage all customer conversations from one place, improving response times, team efficiency, and customer satisfaction.
About Texting in EngageCX
Texting in Engage CX is simple and straight forward. As with any online Texting, a registered texting number must be assigned.
- Shared Texting may be enabled at no additional cost in EngageCX. Shared Texting means that one texting number can be assigned to multiple Users.
- Texting Conversations can also be accessed by any of the Queue's Users, and multiple Users may respond to the customer if needed. Each User will be identified internally in the Ticket Conversation, but this will remain invisible to the customer.
- Texting Conversations create "Ticket" records. Whether the Agent or the Customer initiates the Conversation, an automatic Ticket will be created.
- Past Tickets are easily located by either Searching for the individual Ticket, or by accessing the "Resolved" Ticket View for a complete list. Both actions are performed in the Agents Panel.
- Both SMS and MMS are able to be sent and received in EngageCX. Group Texting has not been launched yet at this time.
- Bulk Outbound Texting, known as SMS Broadcast, is now available for both immediate send and scheduled send options.
How Does Text Routing Work?
- Due to nature of texting, there are no assigned "hours" for Texting. However, time-based automatic replies can be set by using an Automated Flow. This allows your customer to receive Afterhours and Holiday automatic texting replies as needed.
- Once customers are routed to the assigned Queue, additional Conditions may be placed to allow for even more customization.
- Distribution of Texting Tickets can be set to do any of the following: Assign to a specific User, distributed to Agents using the Queue's set Distribution Rule, or assigned to the Queue itself to be picked up by any Queue User.
Texting Reply Options
Depending on the needs of the Tenant, the following Reply options are available while in a Texting Conversation.
Reply Option | Description |
Canned Messages | All Users may use Canned Message shortcuts in Web Chat and Inbox Conversations. These are activated by choosing the / symbol, then the shortcut word (example: /looking). If the User is unsure of the shortcut, typing the / symbol will display the list of available messages. |
Notes | Notes follow the internal transcript and post inside it, making is easy to read about Actions taken even after the Conversation is closed. Notes are not visible to the customer. Notes will appear as a light cream/yellow color, while actual Chat will appear gray. |
Attachments, Screenshots, and Emoji/Memes (if enabled) | These options can be used at the discretion of your management. |
| Transfer | Although it won't be in the "reply" options, Tickets may be transferred to any User, online or offline, that is assigned to the Queue. Simply click the Ticket Info option and transfer the Ticket. |
"Replying" in an Existing Text Conversation Ticket
Whenever a new texting thread is initiated, a Ticket is created, regardless of the source.
If Shared Texting is enabled and depending on how the distribution of these Ticket Conversations is set, you may be directly assigned a Ticket, or may be instructed to reply to the Ticket from the Queue itself.
Instructions
- After login, make sure you are in the Agents Panel. This is where all customer conversation is performed.
- Click the Inbox icon.
- Whatever Inbox View is set as your Default (top) View, is what will be previewed in the Ticket Preview Window. If any Tickets exist in this View, all Tickets in this view will be shown in the Ticket Preview Window. If there are no Tickets for this View, then your Preview Window will be blank.
- Make sure to have your preferred Ticket View set as the Default View. Views, and the matching Ticket Preview Window, are accessed by simply clicking each View accordingly. The current displayed View name will be in blue.
- Views can be collapsed to allow for a larger view of the Conversation. If you should not see your Inbox Views, click the Expand icon.
- To reply in a Conversation, simply type your Message. Attachments of 800kb or less may also be sent.
- If more than one Texting number is assigned, you may use the dropdown to choose the Texting Number.
- Click Send when ready.
"In Conversation" Options
When a Texting Conversation is opened, an additional right-hand Menu list will also display.
Inbox
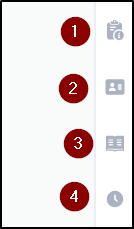
- Ticket Info- This displays all information about the current Ticket Conversation, including Assigned User and Queue, Priority, Tags, and any Custom Field options.
- Contact Information- This displays all available information about this Contact (if any) and the ability to update and/or Merge the Contact if enabled.
- Help Center - This menu displays all Canned Messages (both Public and Private) and any Knowledge Base Articles that have been created in EngageCX.
- History - This menu displays all Inbox History for this Contact, including the Current Conversation.
Initiating an First-Time Outbound Text (no open ticket)
- In the Agents Panel, click the Inbox menu icon.
- Click the + Add icon. at the top of the Views.
- Choose the SMS tab.
- Add the Subject. This will not be sent as part of the Text, but will become the Subject of the Inbox Ticket that will be created from this Outbound Text.
- Type in the number or Contact that you are texting to. Choose the Texting number to text from.
- Type your Message.
- If you are also sending an Attachment (picture/file), click the Attachment paperclip icon. Choose your File (maximum 800kb). It will show Attached to the Message.
- In the side menu, you can manually set up the Ticket assignment so that the Ticket assigns to yourself, or you can choose another Queue or Agent if appropriate.
- Assignment is not required to send the Text, but it is a best practice to do so as it prevents the Ticket from being assigned to an Agent who is unaware of the reason for the Ticket. You may also set Priority and any Tags that your Tenant uses.
- When you are ready, click Send.
- Your Text will send, and the Ticket will automatically be created and distributed.
Adjusting Inbox Views
Views may be set by any User as a Private View. Supervisors and above can also set Shared Views, called Public Views.
- In the Agents Panel, click the Inbox menu icon.
- Click the Manage Views Setting gear icon.
- Your Current Views will open.
- To change the order of your Views, simply click the multi-dot icon to the left of the View and drag the View up or down the list.
- The top View will always be your Default View.
- To Add a View, choose the Add a New View icon in the bottom left.
- Name your View. If you have permission, you may choose to make it Public (shared). Choose your Condition and Save.
- In our Example, we have created a Resolved (closed) Ticket View to display all Inbox Tickets in this Status for the last 90 days.
- Once Saved, any order change or new View will immediately be displayed.
Locating a Ticket
To find a type of recent Ticket, you may simply use your Views and scroll until the Ticket is found. However, to find a specific Ticket, you may search instead using the method below.
Instructions
- Above the Views, click the Search magnifying glass icon.
- Your Views will collapse and the Search bar will open. You may type in your keyword here.
- If you need a stricter set of parameters, click the Filter icon on the far right of the Search bar instead.
- Choose your Condition(s). You may search by Fields, Assignee, Queue, and more.
- As each Condition is added, the Results will automatically update.
- Clicking on the Result will open up the Ticket.
- To return to the clickable Inbox Views, click either See all or the Search icon, depending on where you are in your Search.
- In Ticket
- In Results
How Do I Get EngageCX?
Just contact your Account Executive at 800-786-6160 for a Quote!
Prefer to contact us another way? You can also contact us by email or by request form!
By Request: Request Form.
Want to learn more about other Integration Options?
Give our Customer Service Team a call at 1-800-676-3995! We are available Monday-Friday 8am-9pm EST.
We’re here to help you find better, easier ways to run your business.
Related Articles
EngageCX Missed Call Text Back
Missed Call Text Back Ready to capture every Call? Missed Call Text Back automatically sends a quick text when a call is missed, so your caller gets an immediate response and invitation to live Text with you. With one message, you can: Set ...How to Update Texting Routing in EngageCX
What Is EngageCX? EngageCX is an upcoming omnichannel product that will allow for an integration of Web Chat, Texting, Email, and Social Media into a single interface. It empowers businesses to manage all customer conversations from one place, ...EngageCX Agents Panel Navigation
What Is EngageCX? EngageCX is an upcoming omnichannel product that will allow for an integration of Web Chat, Texting, Email, and Social Media into a single interface. It empowers businesses to manage all customer conversations from one place, ...How to Web Chat from EngageCX
What Is EngageCX? EngageCX is an upcoming omnichannel product that will allow for an integration of Web Chat, Texting, Email, and Social Media into a single interface. It empowers businesses to manage all customer conversations from one place, ...EngageCX FAQs
What Is EngageCX? EngageCX is our new omni-channel product that allows Web Chat, Texting, Email, and Social Media to be integrated into a single interface. It empowers businesses to manage all customer conversations from one place, improving response ...