How to Update Web Chat Routing in EngageCX
What Is EngageCX?
EngageCX is an upcoming omnichannel product that will allow for an integration of Web Chat, Texting, Email, and Social Media into a single interface.
It empowers businesses to manage all customer conversations from one place, improving response times, team efficiency, and customer satisfaction.
About Web Chat Routing
Web Chat Routing can be set to follow its own Specific Queue Times or to follow the "Company Hours" times.
- Holidays/Afterhours times may be added, and during these times, the Offline Routing will apply automatically.
- If all Agents are Offline during the set business hours for the Web Chat Queue, the Pre-Chat Routing (if any) will apply, then follow the Offline Routing when the Queue is checked for the available Agents.
- Web Chat Routing may follow Standard Routing, or Automated Flows may be utilized to give your customers additional options, menus, and/or special Routing Conditions such as Priority, Location, Language, Department, or a customized option.
Web Chat Queue Distribution Options
Regardless of source, all Queues in EngageCX are referred to as Chat Queues. Chat Queues are assigned as Web Chat (Omni Widget), Inbox, or both.
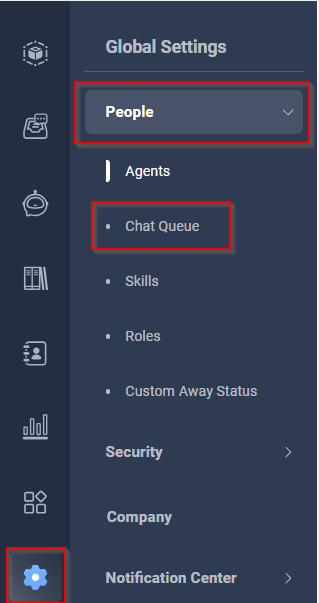
All Chat Queues can be accessed in the Control Panel, by going to Global Settings>People>Chat Queues.
Distribution Option | Description/Best Practice Recommendation |
Auto Distribution Rule | The Options here are: Round Robin- Distributes one by one based in the order the Users came online Load Balancing- Distributes chats to the User with the least amount of chats at the moment Capability Weighted- Distributes chats to Users with a higher concurrent (simultaneous) chat limit ratio Best Practice Recommendation: For even distribution, most Tenants choose Round Robin if their Agents will be taking just one Chat at a time. |
Last-chatted Agent Preferred | Directs Visitors to the same Agent on a return Chat Best Practice Recommendation: There is no specific Best Practice recommendation as this based on preference, however most Tenants will choose to leave this disabled. |
Backup Chat Queue | Adding in a Backup Chat Queue is similar to a Tiered Round Robin in Portal. It allows you to offer the live Chat to one group of Users, then roll to a second group of Users if Agents were unavailable. Best Practice Recommendation: Setting recommendation based on your needs. |
Maximum Number of Concurrent Auto-Accepted Chats | The Maximum Number of simultaneous Chats can be set to one number for your entire team, or assign specific amounts by Agent/User. Users may be set to have the ability to view and/or pick up additional Chats manually as needed. Best Practice Recommendation: Most Tenants will set the Maximum Chat at 1, and set "manually accept chats" to yes. This gives their Users access to view the Waiting Chat Queue at all times. If instructed to do so, they may pick up a Chat manually, whether they are in the Online or Away Status. |
Limit Chat Queue Length | Limit Chat Queue Length allows the Tenant to set a limit of either time or amount of Chats. When this limit is reached, Visitors would receive a "return later" message and would not be allowed to join the Waiting Chat Queue. Best Practice Recommendation: Rather than have Visitors Refused, it is recommended to set a "Maximum Chat" and to set "manually accept chats" to yes. If the Waiting Chat Queue reaches too long of a Wait time, have the Online Users set themselves to Away and continue to take the Waiting Chats by picking them up manually. New Chats would then reach the Pre-Chat information collection, and then be directed to Offline Routing, rather than be Refused and prompted to return later. Waiting Chats would keep their place in line and be picked up in the order they entered. Once the Waiting Chats are cleared, Users would go back to Online Status to allow New Chats to enter the Queue as normal. |
Changing Web Chat Queue Hours or Adding a Holiday
Web Chat Queues can run off their own specific Hours or can be set to follow the set Company Hours.
Any date/time that falls outside of these set times is assigned to the Offline Routing. This is similar to having one Business Hours Time Frame set in Portal, with all other calls following the Default Time Frame Routing.
- A "Holiday" can be added to either the Queue or Company Hours (depending on which one the Queue follows) to apply an override to the normal set Hours and tell EngageCX to allow the Web Chat to follow the Offline Routing instead.
Instructions
- Login as normal to EngageCX. If your Role is permitted to adjust Hours, then you will generally load into the Control Panel view automatically.
- If you were not loaded into this view, or were already in the Agents Panel, you can simply click the Control Panel icon to open this view.
- First, we will check the Queue to determine which Hours it follows. Go to Global Settings. Then, People and Chat Queue.
- Highlight the Chat Queue and choose the Edit pencil icon.
- Choose Office Hours. You can now see if it is following the Global Settings (Company Hours) or its own Specific Settings.
- If the Queue follows its own Specific Settings, you will see the Hours just below the Office Hours setting.
- You may make changes to the normal Queue Hours by using the dropdown in the Working Hours. You can Apply these changes to multiple days at a time. You can add "split hours" by clicking the + Add hours icon.
- You can add a Holiday exception to these Hours by choosing Add Holiday. You can choose Every Year if this is a recurring annual Holiday exception. Currently, this is set to override the entire day, however the Holiday Hours feature is set to be released in April 2025.
- If the Chat Queue is set to follow Global Settings, exit and go to Global Settings, then Company.
- Just as you would in the Chat Queue, you will be under Office Hours. You may make changes to the normal Queue Hours by using the dropdown in the Working Hours. You can Apply these changes to multiple days at a time. You can add "split hours" by clicking the + Add hours icon.
- You can add a Holiday exception to these Hours by choosing Add Holiday. You can choose Every Year if this is a recurring annual Holiday exception. Currently, this is set to override the entire day, however the Holiday Hours feature is set to be released in April 2025.
- If any changes are made in either screen, make sure to Save.
Checking/Changing Initial "Pre-Chat" Routing
When a Visitor chooses the Chat option on the your website, the incoming Chat has three Routing Choices:
- Chat is sent directly through to the Queue.
- For this type of Simple Routing, no information is collected or menu option given prior to sending the Chat to the Queue. The incoming Chat is simply passed through to the Queue.
- A Pre-chat form inside the Chat Widget is presented to the Visitor. This form will collect information and can also allow them to make a choice of Department, Location, or other Routing Option.
- After collection/choice, the Chat, and information collected (if any) is then sent to the corresponding Queue.
- Using Automated Conversation Flow, a set of options, information collection, and/or other choice(s) is offered in Conversation form in the Chat Widget.
- This is often used when the options are too complex for a single form, in order to make the Visitor information collection more natural, or even to forward information by Webhook or Email to an external destination during/after collection.
- After collection/choice, the Chat is then sent to the corresponding Queue, or (if Offline Flow) to the proper set destination.
- Flows provide a visual layout of the entire routing path for easy setup and updates.
The instructions below will assist you in changing what happens, if anything, prior to the live Chat being routed to the Queue.
Instructions
- Login as normal to EngageCX. If you have a Manager or above Role, you may automatically load into the Control Panel. Generally, Supervisors and below will not have access to Routing check or changes, but this may be enabled if needed.
- If you were not loaded into this view, or were already in the Agents Panel, you can simply click the Control Panel icon to open this view.
- If you have the enabled permission, you should already be loaded into the Omni Widget menu. Omni Widget is often just referred to as Web Chat. Web Chat is the only Channel that uses the embedded EngageCX Omni Widget.
- Choose My Widget.
- The last-accessed Chat Widget will display. Make sure to use the down caret to select the correct Widget, as you may have more than one Widget in your Website.
- For example, some Tenants choose to embed a Support Widget in the Help Center portion, and embed a Sales Widget in the main Site, rather than use a single Widget and route to separate Queues based on the Visitor's choices.
- Once you have the correct Widget selected, choose Web Chat. The initial Routing, Conditions, and special options are all controlled from here.
- The Chat Window tab controls the initial connection screen display and the Visitor "in conversation" options. This is also where you may update or change the Chat End options, such as automatic email of Chat Transcripts.
- Choose the Pre-Chat tab. This controls what happens "before" the live Chat is sent to the Queue. You may choose a Form, Flow, or (if disabled) no Pre-Chat action at all.
- Pre-Chat Form can be updated here if needed, including the Form Questions. A live Display is available to show how this change would look visually.
- Pre-Chat Flow (trigger a flow) is created in the Automation Menu, but once created, pointing the Routing at the Flow is done by selecting Trigger a Flow here, then selecting the Flow. Scroll below for more information about Flows.
- Save any changes made in these tabs. Continue to the next section if you also need to adjust Post Chat, Offline, Wrap-up, Flows, or Queue Routing Rules (including routing conditions).
Checking/Changing "Post-Chat" Actions
The instructions here will assist you in adjusting what actions, if any, are taken after the Visitor leaves the Chat.
Instructions
- Login as normal to EngageCX. If you have a Manager or above Role, you should automatically load into the Control Panel. Generally, Supervisors and below will not have access to Routing check or changes, but may be enabled in some Tenants (domains) as needed.
- If you were not loaded into this view, or were already in the Agents Panel, you can simply click the Control Panel icon to open this view.
- If you have the enabled permission, you should already be loaded into the Omni Widget menu. Omni Widget is often just referred to as Web Chat. Web Chat is the only Channel that uses the embedded EngageCX Omni Widget.
- Choose My Widget.
- The last-accessed Chat Widget will display. Make sure to use the down caret to select the correct Widget, as you may have more than one Widget in your Website.
- For example, some Tenants choose to embed a Support Widget in the Help Center portion, and embed a Sales Widget in the main Site, rather than use a single Widget and route to separate Queues.
- Once you have the correct Widget selected, choose Web Chat. The initial Routing, Conditions, and special options are all controlled from here.
- Select Post-Chat. For most Tenants, this option is disabled unless requested. If you would like to view options or make a change here, toggle the Enable Post-chat to on.
- Post-chat allows you to add automatic survey questions to the Chat Window. You may also ask for a Rating, Comments, or even add a custom Field for a specific post-chat question, such as their Location.
- All options are able to be set to optional or required. To hide an existing field, toggle the visibility of the Field to disabled.
- Ratings will appear in the Chat Rating Report. Survey Comments and Fields will appear in the Post-chat Survey Report.
- Save if changes were made. If you need to make additional changes, such as to Offline Routing or Routing Rules, continue in this article.
Checking/Changing the Offline Message (Routing)
During Business/Company Hours, Visitors will be presented with any Pre-Chat routing first, before the Queue is checked for available Agents.
- If no Agents are Online in the Queue, the Routing will then forward to whatever is set in the Offline Routing.
- If Agents are Online but on current live Chats, the Visitor will be placed in the Web Chat Queue to wait for an available Agent.
After Business/Company Hours and during any set Holidays, Visitors will immediately be forwarded to the Offline Routing.
Instructions
- Login as normal to EngageCX. If you have a Manager or above Role, you should automatically load into the Control Panel. Generally, Supervisors and below will not have access to Routing check or changes, but may be enabled in some Tenants (domains) as needed.
- If you were not loaded into this view, or were already in the Agents Panel, you can simply click the Control Panel icon to open this view.
- If you have the enabled permission, you should already be loaded into the Omni Widget menu. Omni Widget is the same as Web Chat, as Web Chat is the only Channel that uses the embedded Omni Widget.
- Choose My Widget.
- The last-accessed Widget will display. Make sure to use the down caret to select the correct Widget, as you may have more than one Widget in your Website.
- For example, some Tenants choose to embed a Support Widget in the Help Center portion, and embed a Sales Widget in the main Site, rather than use a single Widget and route to separate Queues.
- Once you have the correct Widget selected, choose Web Chat. The initial Routing, Conditions, and special options are all controlled from here.
- Choose Offline-Message.
- There are three choices for Offline Routing.
- An Offline Message Form Window: This Form is customizable and allows for Header, Greeting Message, custom Fields for Questions, and the ability to send all Offline Messages to an Email for follow up.
- A Website URL Page of your Choosing: If you already have a "request" form embedded in your Site, you may choose to use this page as your Offline messaging rather than create a new Form or Flow.
- An Automated Flow that can present additional options, ask specific questions, and use other Queues and Flows. You may point your Offline Routing at a Flow by choosing Trigger a flow, then choosing the Flow.
- Save any changes. If you need to also make changes to the actual Routing Rule of the Web Chat Queue, continue on this page.
Checking/Changing Queue Routing Rule Conditions
EngageCX Routing is truly customizable for your business.
This means that in addition to "pre" and "post" Chat Routing options, that Visitors can be further Routed by additional Conditions when they reach the Queue.
Instructions
- Login as normal to EngageCX. If you have a Manager or above Role, you should automatically load into the Control Panel. Generally, Supervisors and below will not have access to Routing check or changes, but may be enabled in some Tenants (domains) as needed.
- If you were not loaded into this view, or were already in the Agents Panel, you can simply click the Control Panel icon to open this view.
- If you have the enabled permission, you should already be loaded into the Omni Widget menu. Omni Widget is the same as Web Chat, as Web Chat is the only Channel that uses the embedded Omni Widget.
- Choose My Widget.
- The last-accessed Widget will display. Make sure to use the down caret to select the correct Widget, as you may have more than one Widget in your Website.
- For example, some Tenants choose to embed a Support Widget in the Help Center portion, and embed a Sales Widget in the main Site, rather than use a single Widget and route to separate Queues.
- Once you have the correct Widget selected, choose Web Chat. The initial Routing, Conditions, and special options are all controlled from here.
- Choose Routing Rules.
- You may choose to send Visitors to one specific Queue with or without the Skill option. Or, you may choose to add Conditions by choosing Custom Rules.
- If Route visitors to a specific chat queue is chosen, use the dropdown to choose your Queue. If your Tenant uses the Skill Condition, it may be added here to that Queue as an assigned Condition as well.
- If Route visitors based on custom rules is chosen, you will have several options to route based on Conditions, including Skills (if used). To add a Condition, simply click the Add + icon, choose the Condition, and parameters for meeting the Condition (meets all/meets any). (Example just below)
- If any changes were made, Save.
- Want to see an example of a Custom Rule? See below.
- Does your Pre-Chat and/or Offline Routing point to a Flow, and you would like to view it? Scroll down to: "Viewing an Automated Web Chat Flow".
Web Chat Custom Rule Use Case Example
- Example A Use Case (Field Routing Rule): This Tenant uses a single Web Chat Widget for both Support and Billing inquiries. They need a way to route to each Department and to track which customers go to each.
- How It Works: The Pre-Chat Routing asks whether the Visitor is looking for Billing. The Condition is then set "if Billing is yes" then route to the Billing Queue instead. Priority remains at the default of Normal since all the Billing Customers are routed the same way and to the same Queue.
- Example B Use Case (VIP Routing Rule)- The Tenant also has a specific VIP Company that pays for premium Support. They need a way for anyone from this Company to have the lowest Chat wait time possible.
- How It Works: The Pre-Chat Routing collects Visitor Information, including Company. The Condition is then set "if Customer is (this company's name)", then route to Support Chat Queue with High Priority. Now, when the Visitor answers with this Company for Company Name, they enter the Support Chat as normal, but at a higher priority level than other Visitors. This moves them to the top of the list of any Chats that are waiting.
- If the Visitor didn't meet either of these set Conditions, they would be routed as normal through the Support Chat Queue to the Online Agent.
In effect, these two Rules create three Routing paths: one for Billing, one for the VIP Company, and one for Support (anyone who doesn't meet the other conditions).
Viewing an Automated Web Chat Flow
Generally, no changes will be made to Automated Flows once they are set except by Clarity Voice at your request.
- If you have changes to a Flow, please contact us, and we would be more than happy to review your Flow with you to ensure that all options chosen meet your needs.
Want to see what your Flow does? Follow the below instructions.
Instructions
- Login as normal to EngageCX. If you have a Manager or above Role, you should automatically load into the Control Panel. Generally, Supervisors and below will not have access to Routing check or changes, but may be enabled if needed.
- If you were not loaded into this view, or were already in the Agents Panel, you can simply click the Control Panel icon to open this view.
- If you have the enabled permission, you will be able to see the Automation menu.
- You will load directly into the Flow Builder and Flows.
- To view a Flow, click on the Flow name. A full visual layout of the entire Flow will open.
- You may adjust the view size for easier viewing and even screen shot this Flow for later view (if you have a screenshot tool).
- The Add Step menu will be on your left-hand side view. See below for a walkthrough of Web Chat Flow Available Routing Steps.
Available Web Chat Flow Options
Send Content
Collect Info
Flow Operations
Advanced
How Do I Get EngageCX?
Just contact your Account Executive at 800-786-6160 for a Quote!
Prefer to contact us another way? You can also contact us by email or by request form!
By Request: Request Form.
Want to learn more about other Integration Options?
Give our Customer Service Team a call at 1-800-676-3995! We are available Monday-Friday 8am-9pm EST.
We’re here to help you find better, easier ways to run your business.
Related Articles
How to Web Chat from EngageCX
What Is EngageCX? EngageCX is an upcoming omnichannel product that will allow for an integration of Web Chat, Texting, Email, and Social Media into a single interface. It empowers businesses to manage all customer conversations from one place, ...How to Update Texting Routing in EngageCX
What Is EngageCX? EngageCX is an upcoming omnichannel product that will allow for an integration of Web Chat, Texting, Email, and Social Media into a single interface. It empowers businesses to manage all customer conversations from one place, ...How to Update Email or Social Media Routing in EngageCX
What Is EngageCX? EngageCX is an upcoming omnichannel product that will allow for an integration of Web Chat, Texting, Email, and Social Media into a single interface. It empowers businesses to manage all customer conversations from one place, ...EngageCX FAQs
What Is EngageCX? EngageCX is our new omni-channel product that allows Web Chat, Texting, Email, and Social Media to be integrated into a single interface. It empowers businesses to manage all customer conversations from one place, improving response ...How to Text in EngageCX
What Is EngageCX? EngageCX is our new omni-channel product that allows Web Chat, Texting, Email, and Social Media to be integrated into a single interface. It empowers businesses to manage all customer conversations from one place, improving response ...