How to Update Email or Social Media Routing in EngageCX
What Is EngageCX?
EngageCX is an upcoming omnichannel product that will allow for an integration of Web Chat, Texting, Email, and Social Media into a single interface.
It empowers businesses to manage all customer conversations from one place, improving response times, team efficiency, and customer satisfaction.
How Email and Social Media Routing Works
Read here to see how Messages work when Email and/or Social Media Chat Apps are "imported" into EngageCX,
How Do Inbound Messages Get to Us?
- The Customer messages using their preferred Channel (Email, Facebook, etc.).
- The Message is forwarded into EngageCX. A Ticket is created automatically and routed according to the set Routing Rule.
- Conditions can be applied to apply special Routing.
- No Automated Flows are used in this type of Routing because auto-replies are handled from the main account as normal (with the exception of WhatsApp).
- Tickets are distributed according to the set Queue Distribution setting.
- Agent replies from the Ticket. The Reply is forwarded into the original Account, and then out to the Customer as normal.
- This process is invisible to the customer, and they receive the reply in the original Channel they used. For example, if they messaged through the Facebook Messenger app, they will receive the reply through the Facebook Messenger App.
- Any auto-replies or Conditions set directly in this Account still apply to the Messages.
- Example: If an auto-reply Email is sent when an Email is sent after business hours, when the Customer emails in after business hours, the Customer's original email will still forward into EngageCX, and the Customer will also get the auto-reply Email from the original Outlook account.
- Messages originated from EngageCX will show in the Sent folder of the original Account. Messages received in EngageCX will show in the Inbox of the original Account.
- Messages originating from the Original Account have no forwarding rules assigned to them, so they do not forward into EngageCX and make a Ticket record.
- However, if the recipient replies, their reply would forward into EngageCX as normal.
WhatsApp Additional Routing Option
- WhatsApp allows for an Automated Chat Flow if needed.
- Inside the Flow, the Condition "if Agents are offline" can be chosen, and further replies and/or routing can be applied when this Condition is met.
- To avoid the customer getting double replies if they meet the Condition, WhatsApp Auto-Replies should be set in the Flow or WhatsApp but not both places.
Email and Social Media Chat Queue Distribution Options
Regardless of source, all Queues in EngageCX are referred to as Chat Queues. Chat Queues are assigned as Web Chat (Omni Widget), Inbox, or both.
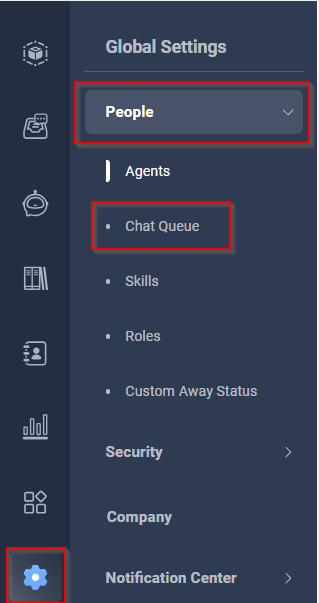
All Chat Queues can be accessed in the Control Panel, by going to Global Settings>People>Chat Queues.
| Distribution Option | Description/Best Practice Recommendation |
| Auto Distribution Rule | The Options here are: Round Robin- Distributes Tickets one by one based in the order the Users came online Load Balancing- Distributes Tickets to the User with the least amount of Tickets at the moment Keep the Chat Queue as Assignee- Tickets assign to the Queue itself and wait for Agents to pick up or otherwise work the Tickets as needed. Best Practice Recommendation: If being worked directly by specific Agents, most Tenants choose Round Robin for even Ticket Distribution. If more than one Agent will be accessing the same Tickets, most Tenants will choose to keep the Chat Queue as the Assignee. |
| Last Assignee Preferred | If the Contact has had a previous Ticket, this setting assigns Tickets to the same Agent (when available) when a new Ticket is opened. Best Practice Recommendation: There is no specific Best Practice recommendation as this based on preference, however most Tenants will choose to leave this disabled. |
| Maximum Number Auto-Assigned Tickets | The Maximum Number of Auto-Assigned Tickets can be to a set to one amount for your entire team, or each Agent/User can be assigned a specific allowed amount. Best Practice Recommendation: The Default Maximum Number is 50, however, most Tenants will choose a much lower number, such as 10 and allow additional Tickets to remain assigned to the Queue until the Ticket load lessens. |
| Distribute Method and Excluded Statuses | Automatically distribute tickets to online agents only allows you to exclude Agents who are not currently in the Online Status from receiving automatically-assigned Tickets. You may still manually assign Tickets to these Agents if needed. Excluded Status allows you to exclude the Statuses Pending External and On Hold from the Agent Ticket Count. These two Statuses indicate that the next step is either waiting on a reply from the Customer or is otherwise on hold because the Conversation is waiting on something that must occur before it can be considered "resolved". Best Practice Recommendation: If Tickets are not being auto-assigned to the Queue itself, then it is recommended to only auto-distribute Tickets to Agents who are online to answer them. It is also recommended to exclude the two hold statuses. |
Checking/Changing Initial Routing
Email and Social Media Routing has the ability to be Routed directly to the Queue by Channel or other Conditions.
- Once customers are routed to the assigned Queue, additional Conditions may be placed to allow for further customization.
Want to see how the Routing is set up? Follow the instructions below.
Instructions
- Login as normal to EngageCX. If you have a Manager or above Role, you should automatically load into the Control Panel. Generally, Supervisors and below will not have access to Routing check or changes, but may be enabled if needed.
- If you were not loaded into this view, or were already in the Agents Panel, you can simply click the Control Panel icon to open this view.
- If you have the enabled permission, you should have access to the Inbox menu.
- Choose Settings, then Routing Rules.
- All Inbox Routing may be sent to a single specific Chat Queue or may be routed based on custom rules.
- If all Inbox Tickets will Route to one specific Chat Queue, that Queue and the assigned Ticket Priority can be set here. The default Priority is "Normal". If all Tickets are routing to a single Queue, generally, you would leave this default as Normal.
- If set to custom rules, Conditions and other parameters can be applied to the Ticket assignment. These options include sending different types of Inbox Tickets to specific Queues, routing Customers who meet a Condition to a specific Queue, or even routing a specific Customer to a single Agent or Queue.
- Click the Add Rule option if a Condition is needed.
- Click Add Condition. Use the dropdowns to choose the Conditions.
- If any changes are made, Save.
- Want to see a Custom Rule Example? See example below.
Email Custom Rule Use Case Example
Example: The Support department has instructed specific customers to use the word "Urgent" in their Subject when they Email in.
- They just need an easy way to prioritize these Emails.
How It Works:
- The Initial Condition is set to catch all email tickets, and the following Condition is that "if Subject contains Urgent", that it be routed to the normal Email Queue, but with a high priority.
- This allows the Agents to use the "High Priority" Inbox View as their default View so that they see these Tickets first and can reply quickly.
- Once saved, we can see that a second Routing Rule catches the remainder of the Emails, and the Default Routing Rule catches tickets that fail to be routed by any of the Custom Rules.
In effect, only two Rules are used to create three Routing paths: one for Emails, one for Emails with Urgent in the Subject, and the default rule catches any other type of Inbox Ticket that does not match these Conditions.
Viewing an Automated WhatsApp Flow
Generally, no changes will be made to Automated Flows once they are set except by Clarity Voice at your request.
However, the instructions here will show you a brief overview of this feature and how to check your current WhatsApp Flow if one is use.
- If you have changes to a Flow, please contact us, and we would be more than happy to review your Flow with you to ensure that all options chosen meet your needs.
Instructions
- Login as normal to EngageCX. If you have a Manager or above Role, you should automatically load into the Control Panel. Generally, Supervisors and below will not have access to Routing check or changes, but may be enabled if needed.
- If you were not loaded into this view, or were already in the Agents Panel, you can simply click the Control Panel icon to open this view.
- If you have the enabled permission, you will be able to see the Automation menu.
- You will load directly into the Flow Builder and Flows.
- To view a Flow, click on the Flow name. A full visual layout of the entire Flow will open.
- You may adjust the view size for easier viewing and even screen shot this Flow for later view (if you have a screenshot tool). The Add Step menu will be on your left-hand side view.
Available WhatsApp Chat Flow Options
Send Content
Collect Info
Flow Operations
Advanced
How Do I Get EngageCX?
Just contact your Account Executive at 800-786-6160 for a Quote!
Prefer to contact us another way? You can also contact us by email or by request form!
By Request: Request Form.
Want to learn more about other Integration Options?
Give our Customer Service Team a call at 1-800-676-3995! We are available Monday-Friday 8am-9pm EST.
We’re here to help you find better, easier ways to run your business.
Related Articles
How to Update Texting Routing in EngageCX
What Is EngageCX? EngageCX is an upcoming omnichannel product that will allow for an integration of Web Chat, Texting, Email, and Social Media into a single interface. It empowers businesses to manage all customer conversations from one place, ...How to Update Web Chat Routing in EngageCX
What Is EngageCX? EngageCX is an upcoming omnichannel product that will allow for an integration of Web Chat, Texting, Email, and Social Media into a single interface. It empowers businesses to manage all customer conversations from one place, ...EngageCX FAQs
What Is EngageCX? EngageCX is our new omni-channel product that allows Web Chat, Texting, Email, and Social Media to be integrated into a single interface. It empowers businesses to manage all customer conversations from one place, improving response ...How to Web Chat from EngageCX
What Is EngageCX? EngageCX is an upcoming omnichannel product that will allow for an integration of Web Chat, Texting, Email, and Social Media into a single interface. It empowers businesses to manage all customer conversations from one place, ...How to Text in EngageCX
What Is EngageCX? EngageCX is our new omni-channel product that allows Web Chat, Texting, Email, and Social Media to be integrated into a single interface. It empowers businesses to manage all customer conversations from one place, improving response ...